Saturday, September 11, 2010

Feeling A Little Miso


One food I've come to enjoy through being vegan is miso. The blurb from Wikipedia reads,

"Miso (みそ or 味噌?) is a traditional Japanese seasoning produced by fermenting rice, barley and/or soybeans, with salt and the funguskōjikin (麹菌?), the most typical miso being made with soy. The result is a thick paste used for sauces and spreads, pickling vegetables or meats, and mixing with dashi soup stock to serve as miso soup called misoshiru (味噌汁?), a Japanese culinary staple. High in proteinand rich in vitamins and minerals, miso played an important nutritional role in feudal Japan. Miso is still very widely used in Japan, both in traditional and modern cooking, and has been gaining world-wide interest. Miso is typically salty, but its flavor and aroma depend on various factors in the ingredients and fermentation process. Different varieties of miso have been described as salty, sweet, earthy, fruity, and savory, and there is a very wide variety of miso available."

As the seasons transition, and I'm lamenting the loss of summer, I'm delving into miso soup. It is a light, clear soup that you can minimize, with just some chopped spring onions or maximize and add tofu, shiitakes, seaweed, squash, whatever you have in the fridge! Miso is so tremendously good for you, you should eat it often. On days were I'm not feeling grounded or are trying to avoid more processed foods, I will drink the broth for breakfast. It fills me up with salty, warm goodness and I feel great for hours. You can also add it to sauces and gravies as a seasoning.

First, miso typically comes in a plastic refrigerated container. You can find it for super cheap at your local asian market. Our favorite is Lilly Market off Halsey and 112th-ish. You need to keep it refrigerated and it will last forever!
Miso is typically very salty and you will only need a bit at a time. Miso needs to be added to your soup or gravy after the cooking of the other ingredients is complete. This is very important! If you boil the miso, you kill all the good bacteria and stuff that makes it so nutritious.

In making dinner-type soup (seen above) I will typically use........
-Bean Thread Noodles
-Shitake mushrooms (I buy dried ones and rehydrate them prior)
-Onions
-Summer Squash
-Tofu
-Garlic
-Bok Choy or Spinach
-Seaweed (I enjoy wakame type seaweed; I've tried nori and do not like it)
Most veggies can be used in this soup, look through your drawers and see what's left. It doesn't have to be a traditional japanese-type soup; make it your own!

Add the mushrooms, the onions, garlic, and some oil to a saucepan. Sautee until soft.

Next, add some water to create a soup.

Add the other veggies and the noodles, bring to a boil and then turn it down to simmer for a while. You want all your veggies and the noodles to be soft. (You might want to cook the noodles separately according to the package and then add to the soup, it's up to you)

Most miso soup recipes call for adding the tofu to the boiling mixture, but I love the chewy skin that is created when you fry the tofu, so I cook the tofu separately in a pan with some tamari (soy sauce) and garlic. Then add it to the soup towards the end.

Once the veggies are soft, then you keep the heat low (no boiling!) and add a tablespoon or so of miso. I've learned to dissolve this miso is a small amount of water prior to adding it to to soup. Otherwise you end up with giant chunks of miso undissolved stuck to your bok choy! Cook for about 5 more minutes.

Stir it all together and serve.

Tuesday, August 17, 2010

Biscuits and Gravy


My husband lives for foods that are heavy, full of rich flavors and fake meats if possible. This morning, when asked what he would like for breakfast; blueberry pancakes? smoothie? tofu scramble? He asked for biscuits and gravy. So I made a compromising biscuits and gravy that turned out full of fresh herbs and lighter on the stomach.
For the biscuits, I whipped up a recipe for "buttah-milk biscuits" from Jae Steele. They were less dense than biscuits I've made in the past.

For the gravy I started with the typical gravy slurry using margarine instead of oil. Added rehydrated TVP, water, mushrooms, spices and fresh herbs.
-3-4 tablespoons margarine
-chopped onion and garlic (enough to meet your needs; I like a lot of garlic and only some onion)
-flour (enough to absorb all the margarine in the pan)
In a hot, frying pan heat the butter until it melts adding the onions and garlic. Once the onions and garlic start to turn translucent add the flour and mix it up. You want to form a thick paste in the pan. Cook for about 30 seconds to cook off the floury taste. Next add water.
-1 to 1 1/2 cups water (I add veggie broth paste next; so if you don't have that use some veggie broth halved by the water)
Whisk it up! You want the flour paste to dissolve in the water/broth mixture. Turn the heat up and bring to a boil. The sauce will start to thicken. Here's the trick; you don't want it to thicken too fast. If it does, add more water because that will be lame gravy if you don't.
At this point, add whatever other ingredients and spices you would like in your gravy. Today I added.....
-1/2 cup chopped mushrooms (I really chop them up. The smaller pieces work better in gravy)
-Ground pepper
-Thyme
-Veggie broth paste (if you didn't use the broth earlier)
-1/2 cup rehydrated TVP
-Fresh oregano, chopped
-Fresh basil, cut into ribbons
Turn down the heat a bit and let everything simmer for about 10 minutes. During this time you should be stirring your gravy to keep it from burning to the bottom.
Viola! Serve on top of biscuits.

Sunday, August 8, 2010

Tostadas

Continuing on my latin food craze, brought on by Viva Vegan, we had tostadas. Lots of delicious toppings with a satisfying crunch. These were anchored by some veg refried beans and seasoned and sauteed tofu with zucchini and onions. Oh and please do not forget the fried plantains; those little nuggets of joy have become a frequent flyer on our dinner menus. Oh and Will's music recommendation for this dinner is Harry Belafonte's All Time Greatest Hits. You'll be calling for the Coconut Woman and dancing at the table; which by the way is the best way to digest!

Saturday, August 7, 2010

Reubens


After finding some delicious double sour dough bread at our local bread outlet, we decided that reubens were for dinner. We've been hearing about using pickling spice to season the tempeh, and at the next stop (our local farmer's market) viola! pickling spice for 79 cents a pound.

I found some neat websites promoting vegan reuben recipes and even one guy who's entire blog is about vegan reubens in Portland! (Check it out! ) Eventually, I settled on the recipe from Where's the Revolution?'s blog (here!)


Slice a little tempeh..... Make it good and thin!
Throw a marinade of some soy sauce, water and the pickling spice over top of the tempeh. I used 1 part soy, 2 parts water and about 3-4 tablespoons spice to cover a whole package of tempeh. You want it to look like there's too much marinade because it's going to cook away. Next, bake the marinated tempeh for about 25 minutes covered and then another 20 minutes uncovered. It will look like the below photo when it is done. You want the marinade to be absorbed and gone!
I made a simple sauce of ketchup, Veganaise, chopped up dill pickles and some lemon juice. Do this by taste. You might like more pickles than me, or a brighter, more tomatoe-y sauce. But the rule of thumb is a nice pink color with the lemon juice to accent and the pickles to be present. You could probably use relish as well, but I don't care for the sweet taste it imparts in certain dishes.


Assemble your sandwiches!
-Sourdough bread-
-Warmed Saurkraut-
(I like to put a sliced tomato here, but that's up to you!)
-Sauce-
-Tempeh-
-Sourdough bread-

Friday, August 6, 2010

Enchiladas

Since I got Terry Hope Romero's new book Viva Vegan I am on a latin food craze. Here I've made enchilada's based on her recipe and ideas behind making the delicious latin food staple.

First I made the guts of the enchiladas. I used the idea from the book of potatoes and chickpeas; but adapted it to be potatoes (boiled prior to adding them to the saute pan), shredded zucchini, rehydrated TVP (I used Bob's Red Mill brand and rehydrated it in veggie broth), onions, a jalapeno, garlic, oregano, cumin, salt, pepper, chili power and added some fresh cilantro right at the end.
After sauteeing the zucchini, onions, jalapenos and garlic (until the are limp and well cooked), then add the tvp, spices and already cooked potatoes. Lastly, take your cooking utensil and smash the potatoes. This helps form a giant paste of your mixture.

Next form your enchilada assembly line. The trick I learned from Terry was to dip your corn tortillas, after heating in a shallow plate of your enchilada sauce. Get both sides all wet, then place it in the baking pan, add the filling and roll tightly. By slopping up the sauce prior, you get the delicious taste all over the enchilada and inside as well.
ps. In this step you will get enchilada sauce EVERYWHERE! Wear an apron and be sure to clean it all up before you move on; or you will permanently have red stain on your kitchen counter :)
Once they are all assembled pour some more of the sauce over top of the enchilada, cover and bake for about 30-45 minutes, un-cover then bake for about 15 minutes more to get that great crispyness.
To serve pour just a bit more of the reserved sauce over top and provide a giant dollop of Sour Supreme. (We didn't have any this night and it really made something that would have been amazing, just really good.)

I also served the enchiladas with a jimaca salad to cool the pallet.
Shredded jimaca + lime juice + salt + lots of fresh cilantro

Tuesday, August 3, 2010

Berries!!!


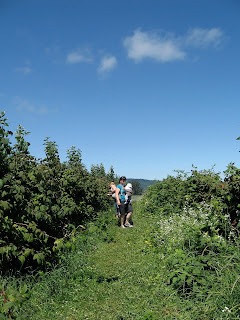
Berries are a summertime delight here in Oregon. I haven't met a person here who doesn't love the fresh berries, whether they pick them themselves or they buy them fresh from the local market. I went went with a couple of friends last week and ended up with a bounty! We went to Sauvie Island Farms where you could pick berries, veggies, herbs, flowers and their peach orchard was in season.

Christie surveys the marionberries, while Thurston wonders about the raspberries.

Picking can either be a social event or an extreme competition on how much you can pick. The first time I picked blueberries I picked seven pounds without blinking! Good thing I love blueberries! This summer it was a more controlled pick and I felt much better with the amount that I picked. Overall $16. Good deal for about 3 pounds of blueberries, a pound of raspberries, about 6 medium sized peaches and a few handpicked flowers. (I forgot to photograph them!)


Amanda found a beautiful zucchini flower!

A little fun in the fields!

There was a love of marionberries among the ladies I was with. I just ate them off the bushes. You have to get the deep purple ones or you won't want another marionberry ever!

When I got home I was overwhelmed on how to use the fruit without making a ton of desserts. For the first few days I just ate them by the handfuls out of the refrigerator. After that I conceded and started making sweet little treats!


Blueberry and Peach Pancakes

These little puppies don't look so great, but they were terrific the first morning. I got the recipe from Ripe From Around Here by Jae Steele. They are essentially just pancakes where once you put them in the pan you press some sliced peaches and blueberries into the batter. You flip and cook on both sides. Yum!

Raspberry and Chocolate Chip Cookies
These were the chocolate chip cookies from the prior post but I added about a handful and a half of fresh raspberries when adding the wet ingredients. They turned out pretty good!

Blueberry Muffins
The classic blueberry muffin recipe veganized. I used the recipe from Jae Steele again. It consisted of using applesauce in place of the eggs.


Monday, August 2, 2010

Hummingbird Cake

Whenever one of the many events in life pop up, most often birthdays, I make one of my favorite cakes; Hummingbird Cake. This is a southern cake that often is served in place of carrot cake. It is a hearty cake, like carrot cake, iced with a cream cheeze frosting that brings a wonderful lightness to the experience.

I adopted the recipe from one I found in a cookbook (unknown) long ago to make it vegan. I use flax for eggs, but I'm sure that you could try applesauce. The original makes two 9 in cakes, but I find that often that amount is too much so I have halved the recipe. If you feel that you would like more you can double what is presented below and it will make the two 9 in pans worth.

1 1/2 cups all-purpose flour
1 cup granulated sugar
1 teaspoon baking soda
1 teaspoon ground cinnamon
1 teaspoon salt
(3 large eggs) I substitute about 4-5 tablespoon ground flax seed combined with 5 tablespoons of boiling water.
1/2 cup vegetable oil
1 teaspoon vanilla extract
1 cup chopped ripe bananas (about 2 medium sized)
4 ounces crushed pineapple with juice (typically these are sold in 8 oz cans; I use 1/2 then add some of the remaining to the icing)
1/2 cup chopped walnuts or pecans

Oven 350 degrees!

Combine dry ingredients in large bowl; flour, sugar, baking soda, cinnamon and salt.

Create your flax 'eggs' in a separate bowl. I really eyeball this part. Flax is so good for you and doesn't really impart a strange flavor or texture, it doesn't matter if you overdo this addition.
You are looking for a texture that is thick, but gooey.

Add this flax mixture and the oil to the dry mixture and stir until the dry ingredients are moistened.

Before the next step I also smash up the bananas in a separate bowl, using a fork or a potato masher. It makes it easier to mix into the batter and it also distributes the banana throughout the cake.

Stir in the vanilla, banana, pineapple with juice and nuts into your main large bowl. Now you have your batter. I love this batter because without the eggs and that nonsense you can stick a spoonful in your mouth. This batter is really tasty and it's hard not to eat too much of it!


Pour the batter into a oiled pan. Bake for 40 minutes or so until a toothpick can be inserted into the middle and come out relatively clean. It's not going to come out completely clean and the cooking time may vary. I look for a golden outer crust and then as long as the toothpick isn't covered in batter, I call it good.

While the cake is cooking prepare the frosting! See below!

Remove the cake from the oven after it's cooking time and let it cool about 15 minutes in the pan. Next run a butter knife along the inside of the pan to loosen the cake. Invert a plate over the top of the pan, flip and shake and jiggle it until it pops out onto the plate. Flip the cake back over.

Once it's completely cool, you want to split the cake so that it will be two layers and you can frost the middle. I find the best results when I oil my super sharp knife before cutting the cake.

Frost with the cream cheeze frosting in the middle, reassemble and then frost the top.

If you want to make the cake ahead of time, wait to frost. You can wrap it in plastic wrap and pop it in the fridge for a couple of days. Let it warm to room temperate before serving.

Cream Cheeze Frosting
1/2 pound Better Than Cream Cheese by Toffuti
1/4 cup margarine, softened (I just leave it on the counter top for about 30 minutes or so)
1 teaspoon vanilla extract
1 pound confectioner's sugar
2-3 tablespoons of crushed pineapple with juice (optional)

Combine cream cheeze and margarine in a bowl and mix until creamy. Add the vanilla extract and the pineapple if you are using it. Mix.

Gradually add the sugar, beating on a low speed until you have a good consistency.

Frost your creation!

Tips!
-I don't have a hand blender, so I sift the confectioner's sugar through a mesh strainer over top of the bowl and then mix. A little at a time. This helps a lot with the clumps of sugar that form in the frosting.
-Also, I often don't use the entire pound of confectioner's sugar. I look for a thick, creamy frosting and when my arm is way tired of mixing frosting. If you have a hand mixer you should go for more sugar and try for the fluffy consistency.